Published
- 13 min read
[DEEP DIVE] Vertical Slice Architecture in .NET: a practical guide
![img of [DEEP DIVE] Vertical Slice Architecture in .NET: a practical guide](/_astro/AL_2026_09_25.hSZzmKq8_Zthud8.jpg)
Imagine this:
You are just hired to develop a small reporting app…
…that only Nancy from accounting will use.
Question:
For this small application, will you use:
A) Vertical Slice Architecture
B) Microservices
C) N-Tier Architecture
D) Vertical Slice Architecture
If you answered A) or D), you are correct.
But when most developers start a new .NET project, regardless of the app and requirements size, they follow the classic layered approach.
Put controllers at the top, services in the middle, and repositories as the bottom layer.
Or if they feel real adventurous, and have watched a couple of YouTube videos, they use Clean Architecture.
This kind of separation by projects has its place in some cases. (And I’ll discuss when to use Clean Architecture vs Vertical Slice Architecture at the end of the article.)
But once your project starts growing, that layered/multi-project structure can slowly start working against you.
A simple feature like “Create Order” can touch five or more folders:
- controllers,
- services,
- repositories,
- domain models,
- mapping profiles,
- DTOs,
- validators.
And if you don’t split the features so that each has its own handler, all operations related to the Order feature can start piling in the same service file. Therefore, it’s not unusual for me to see in existing projects those service classes with 2000+ lines of code.
However, this kind of codebase is not the only way you can build apps.
Especially when the app needs to start (and) stay small in size and scope.
In those cases, you can use Vertical Slice Architecture.
It’s a simple and intuitive way to structure .NET applications. And it tends to grow much more gracefully than a layered system.
Let me show you how it works.
What is the Vertical Slice Architecture?
Instead of grouping code by technical layers, you group everything by feature.
Each feature becomes a self-contained slice of the application. That means that you put all the code related to that feature in a single folder.
For example, the “Create Customer” feature might look like this:
Features/
   Customers/
      Create/
         CreateCustomerEndpoint.cs
         CreateCustomerRequest.cs
         CreateCustomerResponse.cs
         CreateCustomerUseCase.cs
         CreateCustomerValidator.cs
Or when expanded inside Visual Studio.
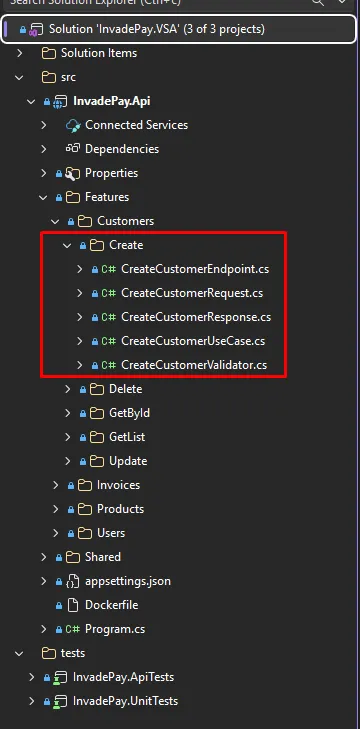
When you need to change something in that feature, you open the folder, and you perform all changes related to that feature in that single folder.
Step by step code walkthrough: the “Create Customer” slice
Let me walk you through a real .NET project that follows Vertical Slice Architecture.
This is from InvadePay, an invoicing app I built for the Zero to Architect Playbook course.
The solution structure is simple. Compared to Clean Architecture, where you might have 4-5 projects, here we have one main project where all features and infrastructure logic live together:
src/
   InvadePay.Api
tests/
   InvadePay.ApiTests
   InvadePay.UnitTests
Inside InvadePay.Api, there’s a Features folder. That’s the heart of the whole thing:
InvadePay.Api
 └── Features
       ├── Customers
       ├── Invoices
       ├── Products
       └── Users
Here’s how that Features folder might look with more features built.
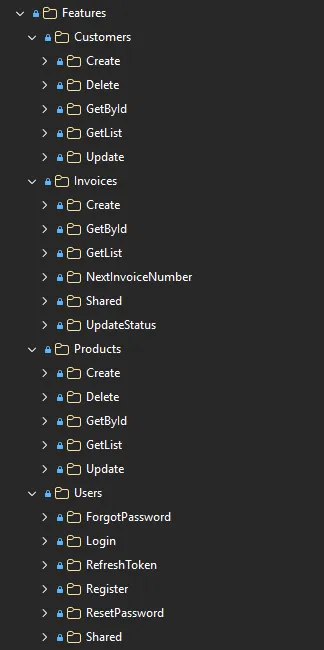
Each root folder represents a domain area. Inside each domain, every use case has its own slice folder.
Now, let’s drill into the “Create Customer” slice and go file by file.
The endpoint
The API layer is extremely thin.
Accept the incoming HTTP request, call the use case, and return an HTTP response.
public class CreateCustomerEndpoint : IEndpoint
{
    private const string GetCustomerEndpointName = "GetCustomer";

    public void MapEndpoint(IEndpointRouteBuilder app)
    {
        app.MapPost("/customers", CreateCustomer)
            .WithSummary("Creates a new customer with specified details.")
            .Validator<CreateCustomerRequest>()
            .WithTags("Customers")
            .RequireAuthorization();
    }

    private static async Task<Results<
        CreatedAtRoute<CreateCustomerResponse>,
        BadRequest<string>>> CreateCustomer(
            CreateCustomerRequest request,
            CreateCustomerUseCase useCase)
    {
        var result = await useCase.Execute(request);

        return result.IsSuccess
            ? TypedResults.CreatedAtRoute(
                result.Value, GetCustomerEndpointName, new { id = result.Value.Id })
            : TypedResults.BadRequest(result.ErrorMessage);
    }
}
Every endpoint class implements the IEndpoint interface, which has one simple method: MapEndpoint.
There’s a configuration class that scans for all classes implementing IEndpoint and maps them as API endpoints automatically.
The request and response
These model the incoming and outgoing data for this feature only.
public record CreateCustomerRequest(string Name, string Email);

public record CreateCustomerResponse(long Id, string Name, string Email);
The crucial rule here is that every subfeature, that is:
- create a customer,
- retrieve a customer,
- update a customer,
- get list of customers
Has its own set of DTOs.
Why?
Well, this decouples slices. If you have one (giant) CustomerDto that is used by several slices, you have a couple of problems:
- Every change to the
CustomerDtorisks breaking more related features that rely on that DTO. - Clients in the frontend might get confused what fields to pass. For example, they see the ID property while they are creating a new customer. Does that mean they need to pass the ID value? What should that value be? Trivial example, but I’ve been in these kinds of situations.
Rule of thumb: Every feature gets its own Request and Response data object.
The validator
Each slice owns its own validation.
The validator lives right next to the request it validates. The validation is done using FluentValidation. The validator checks the incoming data, and returns a 400 Bad Request response if the data doesn’t satisfy validation rules.
public class CreateCustomerValidator : AbstractValidator<CreateCustomerRequest>
{
    public CreateCustomerValidator()
    {
        RuleFor(x => x.Name)
            .NotEmpty()
            .MaximumLength(200);

        RuleFor(x => x.Email)
            .NotEmpty()
            .EmailAddress()
            .MaximumLength(100);
    }
}
The handler
This is the handler class that performs the business operation. I’m calling it “UseCase” in this solution, but you can think of it as a handler class.
public class CreateCustomerUseCase
{
    private readonly IDbContext _dbContext;
    private readonly ICustomerCrmService _customerCrmService;

    public CreateCustomerUseCase(IDbContext dbContext, ICustomerCrmService customerCrmService)
    {
        _dbContext = dbContext;
        _customerCrmService = customerCrmService;
    }

    public async Task<Result<CreateCustomerResponse>> Execute(CreateCustomerRequest request)
    {
        var existingCustomer = await _dbContext.Set<Customer>()
            .FirstOrDefaultAsync(x => x.Email == request.Email);

        if (existingCustomer != null)
        {
            return Result.Conflict("A customer with this email already exists.");
        }

        var customer = new Customer
        {
            Name = request.Name,
            Email = request.Email
        };

        _dbContext.Set<Customer>().Add(customer);
        await _dbContext.SaveChangesAsync();

        await _customerCrmService.SyncCustomer(customer);

        return new CreateCustomerResponse(customer.Id, customer.Name, customer.Email);
    }
}
Notice it depends on IDbContext, not on AppDbContext directly.
This keeps the use case testable and decoupled from the concrete EF Core implementation. If you have any external integrations, like syncing a new customer to a CRM system, the calls to those services can also go here.
Finally, the method return result is a strongly-typed Result<T> (the Result pattern), not an HTTP response. Then the endpoint is responsible for translating that result into the correct HTTP status code.
The end-to-end flow
Let’s follow a request from start to finish, so you can see how the pieces work together:
- API endpoint receives HTTP request -
CreateCustomerEndpoint.cspicks up thePOST /customerscall. - Request object is created - ASP.NET deserializes the body into a
CreateCustomerRequest. - Validation runs - The endpoint filter invokes
CreateCustomerValidator. If it fails,400 Bad Requestis returned immediately. - Handler executes business logic -
CreateCustomerUseCasechecks for duplicates, creates the customer, saves to DB, syncs to external services. - Use case returns a Result - Either success with a
CreateCustomerResponse, or an error with a message. - Endpoint maps to HTTP response - Success becomes
201 Created. Failure becomes400 Bad Request.
Simple.
Oh, and I don’t use MediatR or a similar library since I don’t need that kind of indirection here.
Where does the shared code go?
A common, and natural question you might have once you start using Vertical Slice Architecture is this:
“Where do I put code that I need to share between features?”
Well, there are two levels.
Level 1: shared within a module. If you have logic that’s duplicated across several features inside a single domain, create a Shared folder inside that domain. For example, the Invoices module has a shared InvoiceNumberFormatter class that consistently formats invoice numbers:
Features/
   Invoices/
      Create/
      GetById/
      UpdateStatus/
      Shared/
         InvoiceNumberFormatter.cs
Level 2: shared at the project level. If you have to share code between different modules, use a Shared folder at the project root:
Shared/
   Configuration/
   Database/
   DomainEvents/
   Emailing/
   Filters/
   Identity/
   Middlewares/
   Models/
   Responses/
This contains infrastructure-like concerns: IDbContext, AppDbContext, entity configurations, emailing, security, middleware, and shared models like Result<T> and PagedResponse<T>.
The rule is simple: share infrastructure, duplicate business logic.
Your Shared folder is healthy if it contains no feature-specific code. If you start seeing things like CustomerHelper.cs in there, something went wrong.
How to structure your slices
There’s more than one way to organize the files inside a slice. Here are the two most common approaches I’ve seen (and used).
Approach 1: separate files per slice
This is what InvadePay uses. Each class gets its own file:
Create/
   CreateCustomerEndpoint.cs
   CreateCustomerRequest.cs
   CreateCustomerResponse.cs
   CreateCustomerUseCase.cs
   CreateCustomerValidator.cs
The advantage is clarity.
Every part of the slice has a dedicated file. Naming is explicit. Navigation in the IDE is fast because you can search for CreateCustomerUseCase and land directly where you need to be.
The downside? It can feel like a lot of files, especially for simple CRUD slices where the request is a one-liner and the response is two properties.
But I still prefer this approach.
Approach 2: single file with extracted concerns
Instead of five separate files, you put the main code in a single file: request, response, handler, validator, and endpoint all live together:
Create/
   CreateCustomer.cs          ← request, response, handler, validator, endpoint
The advantage is speed.
You open one file and see the entire feature top to bottom. Naming gets simpler too. Some developers use nested static classes so the request becomes CreateCustomer.Request instead of CreateCustomerRequest.
The downside? If the logic is complex, that single file grows tall and becomes harder to read.
Which one should you pick?
Both are OK.
But I lean toward separate files.
The important thing is to pick one and be consistent within a project. Mixing both styles inside the same solution creates confusion for the next developer who opens the code.
MediatR or no MediatR?
Like I’ve already mentioned, I don’t use MediatR.
The handlers are plain classes, injected directly into the endpoint via method injection.
Just to remind you, here’s how I inject the CreateCustomerUseCase handler class inside the Minimal API endpoint:
private static async Task<Results<CreatedAtRoute<CreateCustomerResponse>,BadRequest<string>>>
CreateCustomer(
        CreateCustomerRequest request,
        CreateCustomerUseCase useCase)
{
    var result = await useCase.Execute(request);

    return result.IsSuccess
        ? TypedResults.CreatedAtRoute(
            result.Value, GetCustomerEndpointName, new { id = result.Value.Id })
        : TypedResults.BadRequest(result.ErrorMessage);
}
For me, MediatR adds a layer of indirection.
When you call mediator.Send(command), you have to go find the handler that processes it. With a plain use case class, the endpoint calls useCase.Execute(request) and you can Ctrl+Click straight to the implementation.
There is no additional searching you have to do.
For a single-project application with a clear structure, I find that directness more valuable than the flexibility MediatR offers.
So when does MediatR make sense?
When you need pipeline behaviors.
MediatR’s biggest strength is its pipeline. You can plug in cross-cutting concerns like validation, logging, and performance monitoring once, and they apply to every handler automatically. If you have 50+ use cases and want consistent logging and validation without repeating code, MediatR pipelines are worth it.
But even when you need to implement cross-cutting concerns, you can use the endpoint filters feature of Minimal API. That’s how I handle validations. I have a filter that scans for the right IValidator and validates the incoming request before the use case is even called.
internal class EndpointValidatorFilter<T>(IValidator<T> validator) : IEndpointFilter
{
    private IValidator<T> Validator => validator;

    public async ValueTask<object?> InvokeAsync(EndpointFilterInvocationContext context,
                                                EndpointFilterDelegate next)
    {
        var inputData = context.Arguments.OfType<T>()
            .FirstOrDefault(a => a?.GetType() == typeof(T));

        if (inputData is not null)
        {
            var validationResult = await Validator.ValidateAsync(inputData);
            if (!validationResult.IsValid)
            {
                return Results.BadRequest(
                    validationResult.Errors.Select(e => e.ErrorMessage).ToList());
            }
        }

        return await next.Invoke(context);
    }
}
In the end, you get the same result, just by using a different, built-in mechanism.
Like with every other architectural decision, you need to understand the tradeoffs.
How to adopt VSA in an existing project
If you have an existing layered project, you don’t have to rewrite it.
The beauty of Vertical Slice Architecture is that it can coexist with your current structure. You can start using slices for new features while leaving the old code untouched.
Yes, this might seem a bit clunky at first. But over time, if you rewrite those existing features to use Vertical Slice Architecture, then the overall app structure will look more organized.
Let me give you an example.
Let’s say InvadePay originally had a layered structure with CustomersController, CustomerService, and CustomerRepository. What you do is that you don’t change that structure at all. That is, unless you continuously have to work with CustomerService that is a giant 2,000-lines-behemoth.
Then you break it feature by feature, as you progress with your tasks.
But if you don’t frequently touch the Customer feature, keep the existing code as-is, and build the next new feature using vertical slices.
Let’s say that’s the Products feature:
InvadePay.Api/
├── Controllers/              ← old layered code, still works
│   └── CustomersController.cs
├── Services/
│   └── CustomerService.cs
├── Features/                 ← new slices, start here
│   └── Products/
│       ├── Create/
│       ├── Delete/
│       ├── GetById/
│       └── GetList/
├── Shared/
│   └── Database/
With this approach, there is zero risk to existing functionality, plus you ship the new features faster.
Over time, when you need to change the old Customers code, that’s when you migrate it into a slice. After a few months, you’ll end up with most of the code slice-based and a few old features still layered.
And that’s perfectly fine. You shouldn’t, and probably won’t have time, to do the migration Big-Bang style. All at once.
Benefits
Code aligned with business features. Instead of searching across five layers, every feature sits in one place. This matches how developers think, how teams work, and how product owners describe what they want.
Easier onboarding. New developers understand the codebase faster because every slice contains its own logic from start to finish. Open the folder, read the files.
Smaller and more focused classes. Service classes don’t grow to 2,000 lines. Handlers stay small and do exactly one thing. That’s the Single Responsibility Principle applied.
Natural testability. Since use cases depend on interfaces like IDbContext, not on controllers or AppDbContext directly, they’re easy to test with simple unit tests.
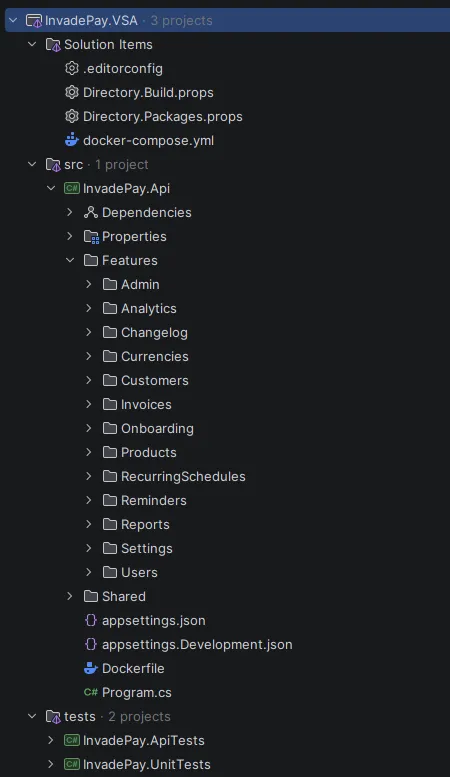
Scales surprisingly well. When the app grows from 10 to 100 features, the structure stays clean. You simply add new slices. You don’t have to touch existing code. I once implemented VSA with 84 features and the overall navigation experience stays smooth.
5 mistakes to avoid
Even with vertical slices, things can go wrong if you’re not careful.
Mistake 1: mixing unrelated responsibilities inside a slice. A slice should be focused on one use case. Don’t create slices that try to handle a whole category of operations. “CustomerManagement” with Create, Update, Delete, and Search all in one folder is not a slice. It’s a mini-monolith.
Mistake 2: creating slices before the feature exists. Wait until you have a task to implement a feature. Premature slices lead to empty folders and unnecessary complexity.
Mistake 3: forgetting to use abstractions. If the use case depends on AppDbContext directly, or calls HttpClient directly without an interface, the slice becomes harder to test and maintain. Always depend on interfaces. That’s the Dependency Inversion Principle applied.
Mistake 4: making the endpoint do too much. Endpoints should stay thin. Get the use case, call it, return the result. The endpoint should not perform any tasks other than those.
Mistake 5: over-organizing. Vertical slices work best when things are simple. Don’t introduce five subfolders inside a single “Create Customer” slice. Keep every slice flat and easy to read.
When to use Vertical Slice Architecture
VSA works great when you’re building a straightforward web API, an internal tool, or a small-to-medium application where simplicity and speed of development matter most.
It’s also the approach I use when I already have a main production app (say, built with Clean Architecture) and need to build a side API or a secondary service.
However, if your application has a complex domain with heavy business rules and deep cross-cutting logic, you might want Clean Architecture or a Modular Monolith instead.
And here’s the good news: these approaches are not mutually exclusive.
You can combine VSA with Clean Architecture patterns and principles. In my Zero to Architect Playbook course, I show exactly how I combine the two for the best of both worlds using my CIA Blueprint approach.
Every Friday I reveal insights with frameworks, tools & easy-to-implement strategies you can start using almost overnight.
Join the inner circle of 14,100+ .NET developers